Spring boot hello world example – Spring boot REST example
Spring boot is sub-project developed by developers of spring framework – to create stand-alone, production-grade application with minimum configuration possible. Spring boot applications are typically bundled as fat/uber jar files and can be deployed in any platform as a simple jar file. This is why spring boot applications are a good candidate for building microservices in java.
Let’s learn it by starting with a spring boot hello world example in eclipse step by step.
Table of Contents

1. Create spring boot hello world project template
2. Import spring boot project to eclipse
3. Spring boot auto configuration
4. Spring boot annotations
5. How to verify auto-configured beans by spring boot
6. Spring boot REST API example
7. Demo
1. Create spring boot hello world project template
To create a template for spring boot application, I will suggest to use http://start.spring.io/. Here, you can select all dependencies which you have currently in mind, and generate the project.
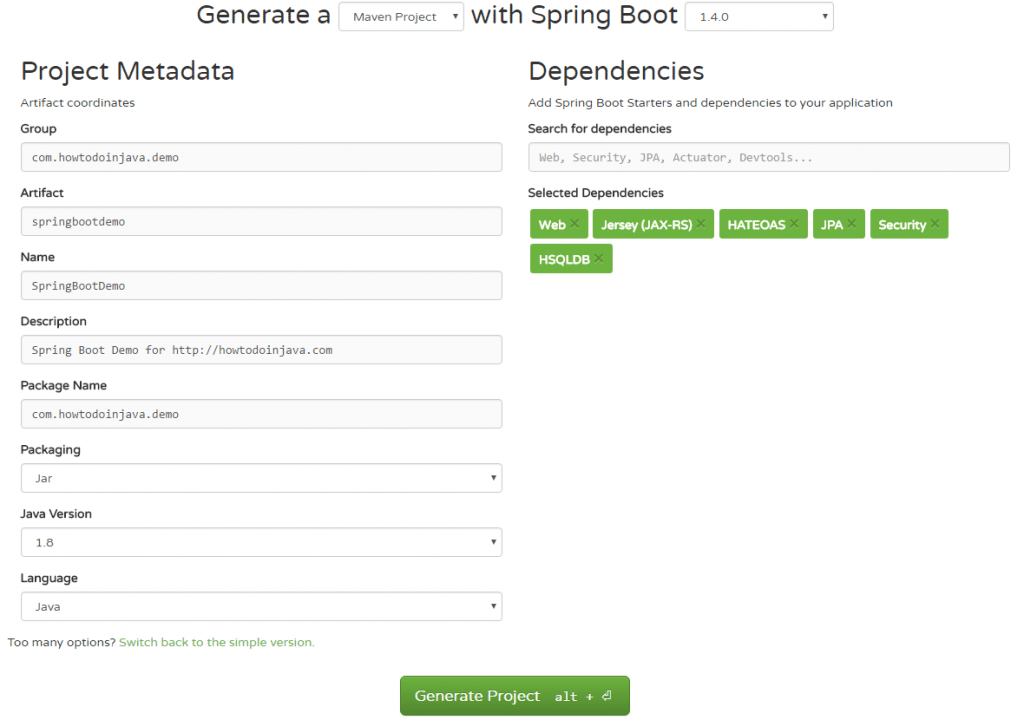
I have selected dependencies like Jersey, Spring Web, Spring HATEOAS, Spring JPA and Spring Security etc. You can add more dependencies after you have downloaded and imported the project or in future when requirements arise.
Generate Project button will generate a .zip file. Download and extract the file into your workspace.2. Import spring boot project to eclipse
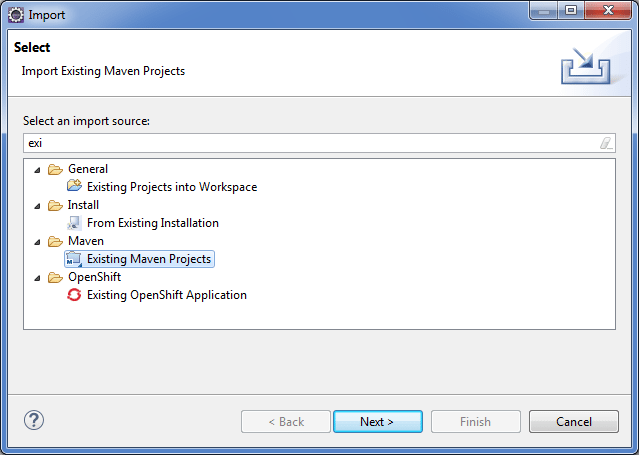
Next step is to import the generated project into your IDE. I have used eclipse for this purpose.
1) Import the spring boot project as existing maven project.
2) Select the
pom.xml file to import it.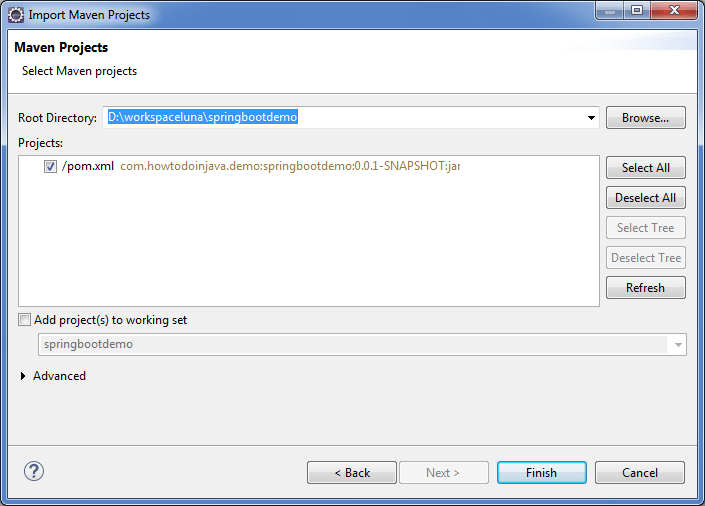
3) Project will be imported and the dependencies you added while generating zip file, will be automatically downloaded and added into classpath.
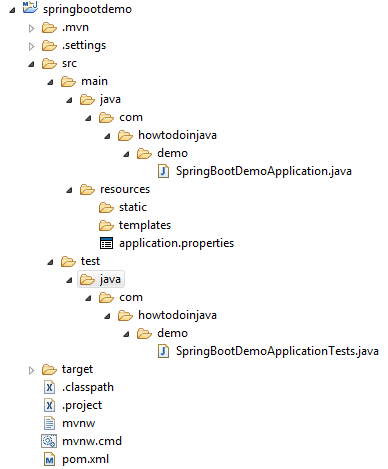
You have now successfully imported spring boot application. Now let’s see what it has already configured for you.
3. Spring boot auto configuration
With spring boot, good thing is when you add a dependency (e.g. Spring security), it make fair assumptions and automatically configure some defaults for you. So you can start immediately.
Spring Boot uses convention over configuration by scanning the dependent libraries available in the class path. For each
spring-boot-starter-* dependency in the POM file, Spring Boot executes a default AutoConfiguration class. AutoConfiguration classes use the *AutoConfiguration lexical pattern, where * represents the library. For example, the autoconfiguration of spring security is done through SecurityAutoConfiguration.
At the same time, if you don’t want to use auto configuration for any project, it makes it very simple. Just use
exclude = SecurityAutoConfiguration.class like below.@SpringBootApplication (exclude = SecurityAutoConfiguration.class)public class SpringBootDemoApplication { public static void main(String[] args) { SpringApplication.run(SpringBootDemoApplication.class, args); }} |
It is also possible to override default configuration values using the
application.properties file in src/main/resources folder.4. Spring boot annotations
Now look at
@SpringBootApplication annotation what it actually does.4.1. @SpringBootApplication annotation
SpringBootApplication is defined as below:@Target(ElementType.TYPE)@Retention(RetentionPolicy.RUNTIME)@Documented@Inherited@SpringBootConfiguration@EnableAutoConfiguration@ComponentScan(excludeFilters = @Filter(type = FilterType.CUSTOM, classes = TypeExcludeFilter.class))public @interface SpringBootApplication{ //more code} |
It adds 3 important annotations for application configuration purpose.
@SpringBootConfiguration
@Configurationpublic@interfaceSpringBootConfiguration{//more code}This annotation adds@Configurationannotation to class which mark the class a source of bean definitions for the application context.@EnableAutoConfiguration
This tells spring boot to auto configure important bean definitions based on added dependencies inpom.xmlby start adding beans based on classpath settings, other beans, and various property settings.@ComponentScan
This annotation tells spring boot to scan base package, find other beans/components and configure them as well.
5. How to verify auto-configured beans by spring boot
If you ever want to know what all beans have been automatically configured into your spring boot hello world application, then use this code and run it.
import java.util.Arrays;import org.springframework.boot.SpringApplication;import org.springframework.boot.autoconfigure.SpringBootApplication;import org.springframework.boot.autoconfigure.security.SecurityAutoConfiguration;import org.springframework.context.ApplicationContext;@SpringBootApplication (exclude = SecurityAutoConfiguration.class)public class SpringBootDemoApplication { public static void main(String[] args) { ApplicationContext ctx = SpringApplication.run(SpringBootDemoApplication.class, args); String[] beanNames = ctx.getBeanDefinitionNames(); Arrays.sort(beanNames); for (String beanName : beanNames) { System.out.println(beanName); } }} |
With my
pom.xml file, it generates following beans names along with plenty of other springframework.boot.autoconfigure dependencies.simpleControllerHandlerAdaptersortResolverspring.datasource-org.springframework.boot.autoconfigure.jdbc.DataSourcePropertiesspring.hateoas-org.springframework.boot.autoconfigure.hateoas.HateoasPropertiesspring.http.encoding-org.springframework.boot.autoconfigure.web.HttpEncodingPropertiesspring.http.multipart-org.springframework.boot.autoconfigure.web.MultipartPropertiesspring.info-org.springframework.boot.autoconfigure.info.ProjectInfoPropertiesspring.jackson-org.springframework.boot.autoconfigure.jackson.JacksonPropertiesspring.jpa-org.springframework.boot.autoconfigure.orm.jpa.JpaPropertiesspring.jta-org.springframework.boot.autoconfigure.transaction.jta.JtaPropertiesspring.mvc-org.springframework.boot.autoconfigure.web.WebMvcPropertiesspring.resources-org.springframework.boot.autoconfigure.web.ResourcePropertiesspringBootDemoApplicationstandardJacksonObjectMapperBuilderCustomizerstringHttpMessageConvertertomcatEmbeddedServletContainerFactorytomcatPoolDataSourceMetadataProvidertransactionAttributeSourcetransactionInterceptortransactionManagertransactionTemplateviewControllerHandlerMappingviewResolverwebsocketContainerCustomizer |
6. Spring boot REST API example
Now it’s time to build any functionality into hello world application. You can add functionality as per your need, I am adding a REST API.
6.1. Create REST Controller
Create a package
com.howtodoinjava.demo.controller and create rest controller inside it.import java.util.ArrayList;import java.util.List;import org.springframework.web.bind.annotation.RequestMapping;import org.springframework.web.bind.annotation.RestController;import com.howtodoinjava.demo.model.Employee;@RestControllerpublic class EmployeeController{ @RequestMapping("/") public List<Employee> getEmployees() { List<Employee> employeesList = new ArrayList<Employee>(); employeesList.add(new Employee(1,"lokesh","gupta","howtodoinjava@gmail.com")); return employeesList; }} |
6.2. Create Model
Create model class
Employee.public class Employee { public Employee() { } public Employee(Integer id, String firstName, String lastName, String email) { super(); this.id = id; this.firstName = firstName; this.lastName = lastName; this.email = email; } private Integer id; private String firstName; private String lastName; private String email; //getters and setters @Override public String toString() { return "Employee [id=" + id + ", firstName=" + firstName + ", lastName=" + lastName + ", email=" + email + "]"; }} |
7. Spring boot hello world example demo
Now start the application by running
main() method in SpringBootDemoApplication. It will start the embedded tomcat server on port 8080.
As we have configured the demo REST API URL to root URL, you can access it on
http;//localhost:8080/ itself.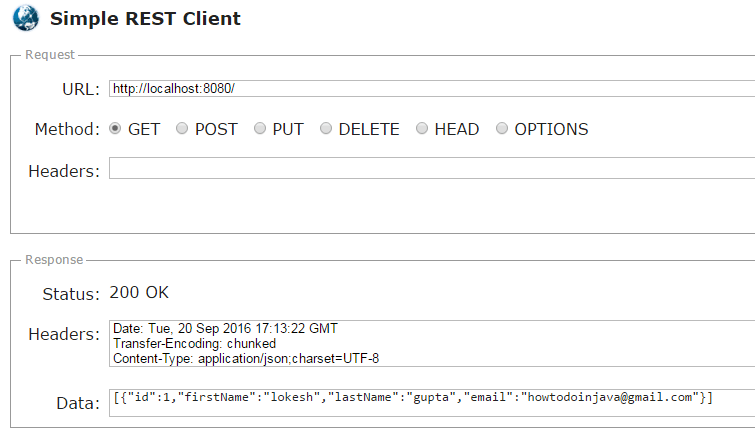
You will get the below response in testing tool or browser.
[{"id":1,"firstName":"lokesh","lastName":"gupta","email":"howtodoinjava@gmail.com"}]
No comments:
Post a Comment